Showing posts with label technology. Show all posts

October 22, 2007

Low budget alternative to Zometool

Some of our mathemathics activities include the use of Zometool. Zometool is a great tool for a variety of construction activities, and I am sure many of you are familiar with the toy. To be able to build freely, you need a variety of the sticks available, and that might be to expensive for some of you. But don't worry, there is a cheap alternative!

I visited Innlandet Science Center a couple of weeks ago, and there they used coctail sticks and peas instead. It is not as solid as Zometool, but it works great. Better than spaghetti and marshmellows/hotglue, as many are familiar with. So if your need a low-cost building tool, try this one. It is the best one I've seen so far.

May 30, 2007

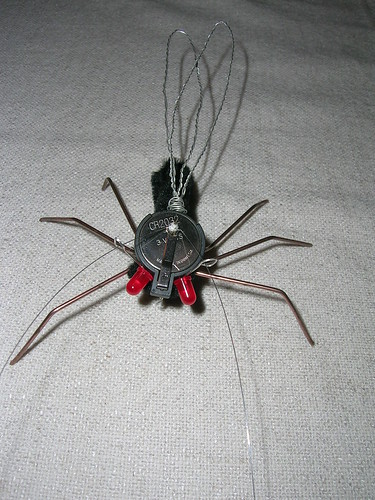
Blinky Mosquito 1st edition

The other day I made the Blinky Mosquito I had planned to. It turned out rather well, but I will change the design a bit to make it easier for small hands to make. I soldered all the electronic, and used string to attach the legs and the wings (because I didn't have any glue available, will use hotglue next time). I tried using a pantyhose to make the wings more correct, drawing veins onto it. But my string was to soft, and the wings collapsed. So for the next time, the string must be less flexible. If you have any suggestions to modifications, please send me a note :)

May 21, 2007

Back from a week in Lofoten

Last week I toured the Lofoten islands, with the topic "Soldering certificate". The new Science theme "T&D" requires skills new to Norwegian kids, and soldering is one of them. To be able to design, make and evaluate their own electronics, they need the basic skills and then some!

One of the schools I visited, where my former teacher Åse Karlsen is the headmaster, has written about the event at their homepage. It is in Norwegian, but is accompanied with a set of photos for everyone to enjoy.

May 01, 2007

Blinkybugs, my first attempt at making one

The other day I made my first blinkybug. All I want to do now, is make another one and improve my own design.

But what is a blinkybug?

I first read about them in Make: magazine and thought they were SO cute. Just recently I was reminded of them when I read about them in the Make: blog, with a link to a site called Instructables. The version described here is a simplified soldering-free one, and is said to take ten minutes to make if you have everything you need ready and handy. I must admit, I spent more time doing it. But I did some detours on the way. I checked the inventor Ken Murphy's own site called Blinkybug.com, and studied the photos of the various versions he had made. I decided to go for the soldered version, but I didn't have a battery holder. To manage the soldering without the battery holder, I realized (after some trial and error) that I would need three hands, and I had no one around to lend me one extra. After some testing with the two I have I decided to go for hotglue instead. My bug didn't look as good as Ken Murphy's ones, but I thought it was ok, considering it being my first trial.
I will certainly make more of these, and will also try to come up with some alternative designs. A sub-arctic mosquito needs to be made, being the most numerous animal in Samiland (within my Science Center's region), and outbeating the reindeer multiple times. That would be a nice signature blinkybug for the Science Center of Northern Norway. I will keep you posted on how it works out. There are some photos of blinkybug(s) at Flickr, and the creativity is great out there!

If you want to try to make one yourself, just use the decription at Instructables. I will try the soldered version, and have found battery holders at Elfa (Northern Europe Electronics Supplier). You also get cheaper batteries here, if you buy a bulk of ten or 40 you save a lot.
If you know of other serious, cheap and swift suppliers worldwide, please send me a note about it.

April 27, 2007

Speedmonster, the toy that sparks creativity

Technology and design is a new topic in the school curriculum here in Norway. At the Science Center we have a toy construction activity for the mid-level classes called Speedmonster. The activity is designed by Elisabeth Kanebog and Marte Karidatter Skadsem, as a collaboration between "Den kulturelle skolesekken" and the Science Center. Elisabeth is an art teacher excelling in design and the design process and Marte is our tech expert in the house. Speedmonster is partially based upon old mechanical toys and the activity is divided in three parts;
  • learning the history and technology of toys
  • learning and doing the design process
  • making, testing and improving the toys
The Speedmonster is a half sphere made from Cernit clay (or similar), with a hole either at the front, the top or the back. Use a small bowl (8-10 cm across) underneath to get the shape right. Cut away excess clay and make sure you have a thicker layer of clay on the sides, to fit the two screws placed on each side underneath the shell, before the shell is baked in an oven. The shell will crack if you try to screw the screws into the clay after it has hardened in the oven.

As you can see on the photo to the right, the mechanichs is a set of wheels with a small piece of wood glued between them. The wheels are attached to the monstershell via rubberbands, glued to the wheels as well. To make sure the rubberbands are firmly attached to the wheels, put a matchstick with glue on in between the two rubber ends. After the glue has dried and hardened, cut off the part of the matchstick sticking out of the wheel hole.
Tie a piece of thread onto the wheels and push the end out of the hole you've drilled in the shell. Attach a small object to the end of the thread, preferably something you've made of the clay, fitting your Speedmonster design.
If you have problems making the Speedmonster walk properly, cut small bands out of a balloon and make rubber tires on the wheels. And if you still can't make it walk, improve your design and make another one! Be creative!
The activity has been a huge success for us, and all the kids have loved it, even if some of them left us with a broken, non-working toy. Their designs have been very creative, it is amazing what they produce. We will continue having the Speedmonster on our activity program, and will offer this to the local schools next spring. If you are interested in more information about the Speedmonster, and live outside Tromsø, I'd be happy to let you in on our tips and tricks, as well as the design protocol.


April 18, 2007

Computer controlled small scale greenhouse

A project I have wanted to test for some time now, is developed by Dag Atle Lysne, Bjørn Tore Esjeholm and Stig Misund at the Finnmark University College. By using the Robolab products from Lego, you can build and program an automated small scale greenhouse. According to the developers it requires about 12 hours to complete this process. After finishing the building and the programming, this greenhouse is a nice tool to sample various plant growth information. The project description of the greenhouse project is in Norwegian, but I can translate it if anyone wants it in English.

I have discussed this project with author Dag Atle Lysne, and he had several suggestions to alternative materials and programming tools. By using Lego bricks, there are some problems with the door solution. The door tend to become either to heavy for the motor or not solid enough to tolerate the frequent opening and closing to regulate the heat. Lysne suggested using other materials like wood, metal, plexiglas or plastics to lower the weight, and combine it with some Lego components.

He also told me he had tried using other programming tools, to increase the difficulty level and gain experience with other tools than Robolab. I do not know which tools he referred to, but I will try to figure it out if anyone are interested.
[Update: A friend of mine, Rob, has written a post about our science center, and suggests some other tools for programming. Thanks!]

April 12, 2007

Our girls fix robots on their own

A few years back, at my former workplace, I had lunch with some of my colleagues. My memory can not recall the topic we discussed, but I mentioned my plans to buy Lego Mindstorms to my three-year old son. When hearing it two of my male colleagues (in their thirties) started to smile and asked simultaneously "When can I come for a visit? - to play!".

They are a part of the Lego generation, just as I am. I must admit, I still play with it. I play with my son, and I play at work. There are many like me out there. This winter we have been amused by an elderly man working at the University and sharing office space with us. He has bought two Lego NXT robots, to play with his grandson, and he enjoys it so much he keeps chatting about it all the time, with great enthusiasm. He makes us smile, and wish for many playful years ahead.

The Science Center organize the local First Lego League contest each year. Over the years we have observed the participating teams and seen a trend across the teams. They were all mixed teams with both girls and boys, and all collaborated in the same manner. The girls wrote the log and prepared the presentation, while the boys built and programmed the robot. Does it sound familiar?

Because of this we decided to gather our own team, girls only, and see if they took the front seat with the boys missing. So for the last two years we have organized and trained a girls-only team. All the other teams came from schools and could work on the project during school hours, while our girls had to work afternoons the whole two-month period. Despite their drawback of having less time available, they worked hard, had plenty of fun, gained new friends and learned lots about robots and programming. In 2005 they won the price for "Best collaboration" and last year they won the price "Best in show". I find it quite impressive, considering the hard competition they have had from teams with years of experience. Last year they ended as number seven, when six teams qualified for the final. Next fall we will set our goals higher, trying to focus more on the programming bit, to get a higher total score and get to the final. Because it is the robot and the programming that is most important in this contest, despite all the circus.

April 11, 2007

Steady hand game, also known as Buzz wire game

At our latest science club for kids aged 9-12, our theme was technology and design. One of our activities was to make a steady hand game.

It turned out to be one of our most popular events ever, based upon the feedback we got from the kids and their parents. The parents were very impressed of what the kids had managed to build.

The games we made required cutting and shaping plastics, assemblying and soldering the electronics, and shaping and mounting the wire. With some help from the adults, even the youngest ones at 9 managed to make stylish looking, fully functioning toys. The games we made were based upon the instructions from a Norwegian book called "Trigger - teknologi og designboka" (2006) written by Eva Celine Jørgensen, Svein Briså and Rolf Ingebrigtsen.

If you want to make one of your own, and have problems with my native tongue Norwegian, do not worry! There are plenty of kits available at various internet stores; just google buzz wire game or steady hand game.

And if you want to do as we did; make it from scratch, there are options out there for you too. Here are a few, varying in difficulty level:

April 10, 2007

Invent to learn

Until Easter we had the pleasure of hosting the exhibition Toy Tech, created by Invention Evangelist Ed Sobey at the Northwestern Invention Center. Ed is a remarkable man, and his "Invent to learn" philosophy is a learning strategy we found very intuitive and efficient.

Toy Tech is an active exhibition, where visitors can play with toys and view adjacent cut-always to see how they work. The exhibition includes some of “The World’s Greatest Toys” exhibit and a workshop. At the workshop visitors can make a variety of toys from inexpensive materials. They learn physics and building skills while becoming empowered to do more exploration. We used the "Invent to learn" philosophy at the workshop. The kids got a task to solve without getting an "instruction leaflet" from us. The idea is to learn by doing mistakes; make a prototype as fast as possible, then test it and correct one flaw at a time. Ed has written several books of this learning method, and I highly recommend two of his books entiteled Rocket-Powered Science: Invent to learn! Create, Build & Test Rocket Designs and Loco-Motion, Physics Models for the Classroom: 25+ Hands-On Projects.
[Update: The Toy Tech exhibition can be viewed at Jærmuseet, the Science Centre in Sandnes, from september. There is also an American version on tour, contact Ed if you want to know more.]